Table of Contents
WordPress is a powerful content management system (CMS) used by millions of websites worldwide. One of the reasons for its popularity is its extensibility through plugins. While WordPress offers a vast library of plugins, sometimes you may need to develop a custom plugin to meet your unique needs. Fortunately, WordPress.org provides a platform for developers to share their custom plugins with the WordPress community. In this guide, we will walk you through the process of publishing your custom plugin to the WordPress.org repository, completely free of charge.
Reasons why you should consider uploading your custom plugin to the WordPress repository
- Increased Visibility: The WordPress repository is the go-to place for millions of WordPress users searching for plugins. By submitting your plugin to the repository, you gain access to a massive user base and significantly increase the visibility of your plugin.
- Credibility and Trust: The WordPress.org repository is trusted by users as a reliable source for high-quality plugins. Uploading your plugin to the repository gives it a stamp of approval, instilling confidence and trust in potential users.
- Easy Installation and Updates: When your plugin is in the WordPress repository, users can install and update it directly from their WordPress dashboard with just a few clicks. This convenience encourages more users to try out your plugin and ensures that they can easily keep it up to date.
- Community Feedback and Support: The WordPress.org repository fosters a vibrant community of developers and users who can provide valuable feedback, bug reports, and support for your plugin. This community engagement can lead to improvements, bug fixes, and even collaboration opportunities.
- Exposure to Potential Contributors: By sharing your custom plugin on the WordPress repository, you open doors to potential contributors who may be interested in enhancing your plugin’s functionality, translating it into other languages, or providing code contributions. This can help accelerate the growth and development of your plugin.
- Contribution to the WordPress Ecosystem: By contributing your plugin to the WordPress repository, you actively contribute to the open-source ethos of WordPress. Your plugin becomes part of the rich ecosystem of free plugins that empowers millions of website owners worldwide.
- SEO Benefits: Having your plugin listed on the WordPress repository can provide a boost to your website’s SEO. The repository’s high domain authority and relevance in search results can help increase your plugin’s visibility and drive organic traffic to your website.
uploading your custom plugin to the WordPress repository offers numerous advantages, including increased visibility, credibility, community support, and the potential for collaboration. It’s an excellent opportunity to showcase your work, connect with users, and contribute to the thriving WordPress ecosystem.
Most Important Things To Keep in Mind Before Publish a Plugin
- Plugin Functionality: Ensure that your plugin serves a clear purpose and provides value to users. It should solve a specific problem or enhance a particular aspect of WordPress functionality.
- Compliance with Guidelines: Familiarize yourself with the WordPress plugin guidelines and ensure that your plugin adheres to them. Pay attention to prohibited functionality, security best practices, and coding standards.
- Code Quality and Performance: Write clean, well-structured, human readable code that follows best practices. Optimize your plugin for performance to ensure it doesn’t slow down WordPress websites.
- Compatibility: Test your plugin for compatibility with different versions of WordPress, as well as popular themes and plugins. Make sure it doesn’t conflict with other extensions and works smoothly in various environments.
- Documentation: Create comprehensive documentation for your plugin. Include clear installation instructions, usage guidelines, and any other relevant information that will help users understand and utilize your plugin effectively.
- User Experience: Strive to provide a seamless and intuitive user experience. Ensure that your plugin’s interface is user-friendly and that its features are easily accessible and well-explained.
- Security: Prioritize the security of your plugin. Regularly update it to address any vulnerabilities, follow secure coding practices, and stay informed about security best practices in the WordPress ecosystem.
- Support and Updates: Commit to providing ongoing support for your plugin. Respond to user inquiries, bug reports, and feature requests in a timely and helpful manner. Regularly release updates to address issues and improve functionality.
- Licensing and Intellectual Property: Ensure that you have the appropriate licenses for any third-party code or assets used in your plugin. Clearly define the licensing terms for your plugin and protect your intellectual property rights.
- User Feedback and Reviews: Embrace user feedback and reviews as valuable sources of information for improving your plugin. Listen to user suggestions, address issues promptly, and maintain open communication with your user base.
Steps to follow for publish your plugin in WordPress:
Step 1: Prepare Your Plugin for Submission Before you submit your plugin to the WordPress.org repository, there are a few important steps to take:
- Ensure Compliance: Make sure your plugin adheres to the WordPress plugin guidelines. This includes avoiding prohibited functionality, using proper naming conventions, and following security best practices.
- Documentation: Create thorough documentation for your plugin. This should include installation instructions, usage guidelines, and any additional information that users may find helpful.
- Version Control: Use a version control system like Git to manage your plugin’s source code. This allows for easier collaboration, bug tracking, and future updates.
Step 2: Create a WordPress.org Account
To submit your plugin, you will need an account on WordPress.org. If you don’t have one already, go to the WordPress.org website and create an account. Remember to choose a username that aligns with your plugin’s identity or your personal brand.
Step 3: Prepare Your Plugin Files
Organize your plugin files in a folder with the plugin’s name. Ensure that your main plugin file has the “.php” extension and follows the WordPress coding standards. Include a readme.txt file that provides a description of your plugin, installation instructions, changelog, and other relevant information.
Step 4: Test Your Plugin
Before submitting your plugin, thoroughly test it to ensure it works correctly and doesn’t conflict with other plugins or themes. Test your plugin on different WordPress versions and configurations to ensure compatibility.
Step 5: Compress and Upload Your Plugin
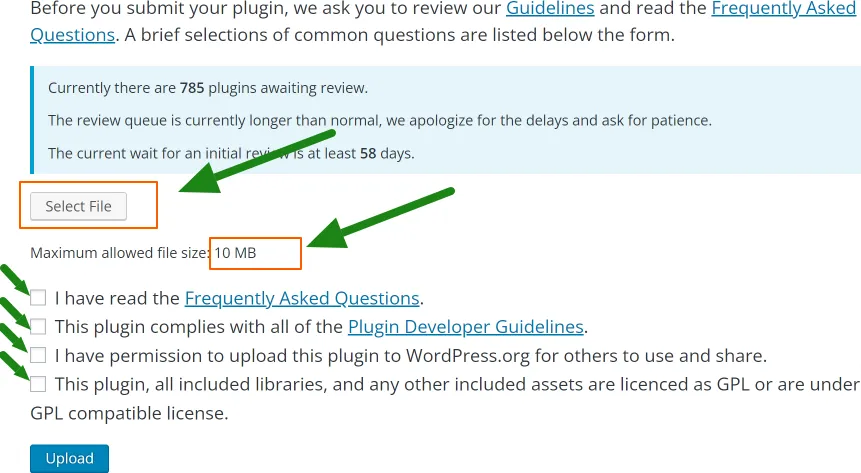
Once your plugin is ready, compress the plugin folder into a zip file. Login to your WordPress.org account, go to the Plugin Developer Dashboard, click on “Select File.”

Fill in the required details, including the plugin guidelines, faq’s and all. Upload the compressed zip file of your plugin, and WordPress.org will automatically extract and process it.
Step 6: Fill Out Plugin Information
After the plugin upload is complete, you’ll be prompted to provide additional information about your plugin. This includes the plugin’s website, a short description, tags, and screenshots. Fill out each field carefully and accurately, as this information will help users discover and understand your plugin better.
Once you upload your plugin to WordPress, it will go through a review process conducted by the WordPress.org team. The duration of the review period may vary and is dependent on several factors, including the current workload of the review team and the complexity of your plugin.

During this time, volunteers from the WordPress community will carefully examine your plugin to ensure it meets the guidelines and follows best practices. They will review your code for security vulnerabilities, verify compatibility with different WordPress versions, test functionality, and evaluate overall quality.
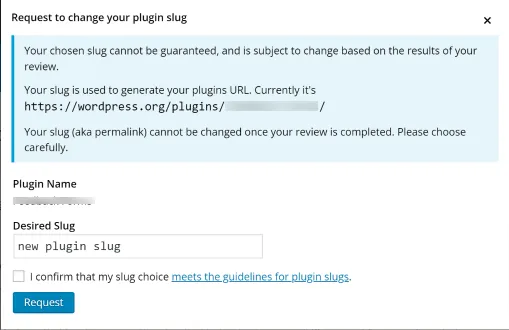
If you want to change the slug (the unique identifier in the plugin’s URL) of your plugin after it has been uploaded to the WordPress.org repository, you can request a slug change, but it must be done before the plugin goes through the review process conducted by the WordPress.org team.

During the review process, the team evaluates the plugin based on various criteria, including the plugin’s name, slug, code quality, security, and adherence to guidelines. Once the review is completed and the plugin is approved, the slug cannot be changed.
Step 7: Manage Your Plugin
Once your plugin is approved, you can manage it through the WordPress.org Plugin Developer Dashboard. From there, you can update your plugin, respond to user reviews, and monitor the download statistics.
In conclusion, publishing your custom plugin on the WordPress.org repository offers numerous benefits for both you as a developer and the WordPress community as a whole. It allows you to showcase your skills, gain visibility, and contribute to the ever-growing library of plugins available to WordPress users worldwide. By adhering to guidelines, ensuring code quality and performance, providing documentation and support, and actively engaging with users, you can create a successful plugin that meets the needs of the community.
Remember that the process doesn’t end with publication. Regularly update your plugin, fix bugs, and introduce new features to keep it relevant and valuable. Listen to user feedback, address their concerns, and continuously improve the user experience. By doing so, you’ll establish a strong reputation as a plugin developer and make a positive impact on the WordPress ecosystem.
So, take the leap, follow the steps outlined in this guide, and share your innovative plugin with the world. Happy coding and contributing to the WordPress community!
For More Posts Click Below:
How to Add a GIF as Preloader on WordPress Without a Plugin: 5 Simple Steps
14 Functions to Supercharge For WordPress Developers with the Latest VS Code Extension!
Running a PHP Project with a Custom Domain on Localhost using XAMPP
Upgrading PHP 5.5 to PHP 5.6: A Step-by-Step Guide to Update Base Images
Debunking the Myth: Is PI Planning Really a Waste of Time
How to Check the Version of ArcGIS Server
WordPress, custom plugin, WordPress.org, publishing, repository, guidelines, code quality, compatibility, documentation, user experience, security, support, licensing, user feedback, review process, slug change, manage plugin, publish custom plugin, publish plugin, plugin developer, WordPress developer.
#WordPress #CustomPlugin #WordPressOrg #PluginDevelopment #Publishing #PluginRepository #CodingStandards #Compatibility #UserExperience #Security #Support #Licensing #UserFeedback #ReviewProcess #ManagePlugin #publishplugin #plugindeveloper #wordpressdeveloper


