A WordPress widget, a new type of WordPress content, enables you to embed content on your site or on another site. We learn how to create WordPress custom widgets in this post.
WordPress widgets are a way of showing content on a website or blog.
What Are WordPress Custom Widgets?
WordPress is great, but often times you don’t want to have WordPress posts and pages everywhere on your website. You want to display your content in places where it makes sense. WordPress widgets let you place your content in a way that makes sense to you.
Widgets show content on WordPress based websites or blog. Widgets are also helpful to developers who need to add content to a specific page or area on your site.
Creating a widget is super easy. Once you create a widget, you can place it on your site and change.
What are WordPress widgets?
They are a bit like HTML box, a tag, that will appear on your web page. Think of them as little boxes that you can place on your web page to display content and then resize them.
In this article, we’ll explore what widgets are and how you can create and use them.
The Most Important Thing to Know
Widgets have to be added to a sidebar. That’s really it. Widgets are a sidebar, like posts, comments, and categories. Once you have widgets added to your sidebars, you’ll have the chance to drag and drop them wherever you like.
The only reason you should ever have widgets disabled is if you want your site to look clean. There is absolutely no point in disabling widgets on your site because it’s so easy to enable them again.
Where do you start when creating a custom widget?
First, you need to choose whether you want to create a widget using a plugin or by editing the function.php file. The plugin will allow custom widgets to work on any site when you add code to function.php. This widget works around a theme.
Second, you may choose to add the widget to a local environment or a live site. To test out the widget, we strongly advise that you first implement it in a local setting.
How Do WordPress Custom Widgets Work?
You must use the default WP Widget class from the Widgets API to develop a custom widget in WordPress. There are around 20 different functions that you may experiment with. Any widget must meet a minimum of four of these in order to function:
__construct() – We construct the widget ID, title, and description at this point.
widget() -Here, we provide the output that the widget produces.
Form() – The form containing widget settings for the backend is created in this section of the code.
update() – We save widget parameters in the database at this point.
Making a Custom Widget for WordPress
In order to teach you the fundamentals of developing custom widgets in WordPress, we’ll make a straightforward “Authors of WordPress” widget. Once it is finished, you can proceed to building more intricate widgets by yourself.
Another thing to keep in mind is that we’re placing this code in the theme’s functions.php file, which is now loaded. This being the case, any custom plugin can utilise the same code.
1. Extend WP_Widget class
create a new class that extends the base WP_Widget class, like:
//register widget at top

// create widget
class authors_widget extends WP_Widget{

// insert construct function here
function __construct() {
         // code
}

// insert widget front-end
public function widget( $args, $instance ) {
        //code
}

// insert widget back-end
public function form( $instance ) {
        //code
}

// update widget replace old instances with new
public function update( $new_instance, $old_instance ) {
        //code
}

}
2. Insert __construct()
The __contsruct() method, which will determine the custom widget’s ID, name, and description.
function __construct() {
		parent::__construct(
			'authors_widget',
			esc_html__( 'Custom - Authors', 'authors_widget_domain' ),
			array(
				'description' => esc_html__( 'Display a list of authors.', 'authors_widget_domain' ),)
		);
	}
3. Add Widget()
It specifies how your front-end custom WordPress widget will look.
	public function widget( $args, $instance ) {
		global $wp_version;

		$query_args = array(
			'order'   => 'ASC',
			'orderby' => 'display_name',
		);

		// Alternative for deprecated `who` property and backward compatibility.

		if ( version_compare( $wp_version, '5.9-beta', '>=' ) ) {
			$query_args['capability'] = array( 'edit_posts' );
		} else {
			$query_args['who'] = 'authors';
		}

		$authors = get_users( $query_args );

		echo $args['before_widget'];
		if ( ! empty( $instance['title'] ) ) {
			echo $args['before_title'] . apply_filters( 'widget_title', $instance['title'] ). $args['after_title'];
		}
		?>
		<div class="widget_content">
			<ul class="widget_list">
				<?php
				foreach ( $authors as $author ) {
					$count = count_user_posts( $author->ID );
					$count = sprintf( _n( '%d Post', '%d Posts', $count ), $count );
					$url = get_author_posts_url( $author->ID );
				?>
				<li>
				 <a href="<?php echo esc_url( $url ); ?>" class="widget_list_portrait" rel="author">
                                 <?php echo get_avatar( $author->ID, 150, 'mystery', esc_attr( $author->display_name ) ); ?>
                                 </a>
                                 <a href="<?php echo esc_url( $url ); ?>" class="widget_list_author">
		                 <h3 class="title"><?php echo esc_html( $author->display_name ); ?></h3>
				    <span class="post-meta"><?php echo esc_html( $count ); ?></span>
				 </a>
				</li>
		                <?php } ?>
	              </ul>
               </div>
	<?php echo $args['after_widget'];
	}
4. Add form()
When you try to add the widget from the WordPress Dashboard, the outcome is shown.
public function form( $instance ) {
$title = isset( $instance[ 'title' ] ) ? $instance[ 'title' ] : esc_html__( 'Our Authors', 'authors_widget_domain' ); ?>
<p>
<label for="<?php echo $this->get_field_id( 'title' ); ?>"><?php esc_html_e( 'Title:', 'authors_widget_domain' ); ?>
</label>
<input class="widefat" id="<?php echo $this->get_field_id( 'title' ); ?>" name="<?php echo $this->get_field_name( 'title' ); ?>" type="text" value="<?php echo esc_attr( $title ); ?>" />
</p>
<?php
}5. Add update()
We use update(), which will update the widget each time the settings are changed.
public function update( $new_instance, $old_instance ) {
		$instance = array();
		$instance['title'] = ( ! empty( $new_instance['title'] ) ) ? sanitize_text_field( $new_instance['title'] ) : '';

		return $instance;
	}
6. Register WordPress Authors Widget
Finally, we must use the add action() function to register the new custom widget. Remember that before extending the WP Widget class, you need add the following code at the top.
function authors_register_widget(){
   register_widget('authors_widget ');
}
add_Action('widgets_init','authors_register_widget');
Add the code to functions.php file
//register author widget at top
function authors_register_widget(){
   register_widget('authors_widget ');
}
add_Action('widgets_init','authors_register_widget');

//create widget
class authors_widget extends WP_Widget{

  // insert construct function here
     function __construct() {
		parent::__construct(
			'authors_widget',
			esc_html__( 'Custom - Authors', 'authors_widget_domain' ),
			array(
				'description' => esc_html__( 'Display a list of authors.', 'authors_widget_domain' ),)
		);
	}

  // insert widget front-end
     public function widget( $args, $instance ) {
		global $wp_version;

		$query_args = array(
			'order'   => 'ASC',
			'orderby' => 'display_name',
		);

		// Alternative for deprecated `who` property and backward compatibility.

		if ( version_compare( $wp_version, '5.9-beta', '>=' ) ) {
			$query_args['capability'] = array( 'edit_posts' );
		} else {
			$query_args['who'] = 'authors';
		}

		$authors = get_users( $query_args );

		echo $args['before_widget'];
		if ( ! empty( $instance['title'] ) ) {
			echo $args['before_title'] . apply_filters( 'widget_title', $instance['title'] ). $args['after_title'];
		}
		?>
		<div class="widget_content">
			<ul class="widget_list">
				<?php
				foreach ( $authors as $author ) {
					$count = count_user_posts( $author->ID );
					$count = sprintf( _n( '%d Post', '%d Posts', $count ), $count );
					$url = get_author_posts_url( $author->ID );
				?>
				<li>
				 <a href="<?php echo esc_url( $url ); ?>" class="widget_list_portrait" rel="author">
                                 <?php echo get_avatar( $author->ID, 150, 'mystery', esc_attr( $author->display_name ) ); ?>
                                 </a>
                                 <a href="<?php echo esc_url( $url ); ?>" class="widget_list_author">
		                 <h3 class="title"><?php echo esc_html( $author->display_name ); ?></h3>
				    <span class="post-meta"><?php echo esc_html( $count ); ?></span>
				 </a>
				</li>
		                <?php } ?>
	              </ul>
               </div>
	<?php echo $args['after_widget'];
	}

   // insert widget back-end
         public function form( $instance ) {
		$title = isset( $instance[ 'title' ] ) ? $instance[ 'title' ] : esc_html__( 'Our Authors', 'authors_widget_domain' ); ?>
		<p>
		  <label for="<?php echo $this->get_field_id( 'title' ); ?>"><?php esc_html_e( 'Title:', 'authors_widget_domain' ); ?>
                  </label>
		  <input class="widefat" id="<?php echo $this->get_field_id( 'title' ); ?>" name="<?php echo $this->get_field_name( 'title' ); ?>" type="text" value="<?php echo esc_attr( $title ); ?>" />
	       </p>
		<?php
	}

    // update widget replace old instances with new
       public function update( $new_instance, $old_instance ) {
		$instance = array();
		$instance['title'] = ( ! empty( $new_instance['title'] ) ) ? sanitize_text_field( $new_instance['title'] ) : '';

		return $instance;
	}
}
It’s time to add the code to your functions.php file at last.
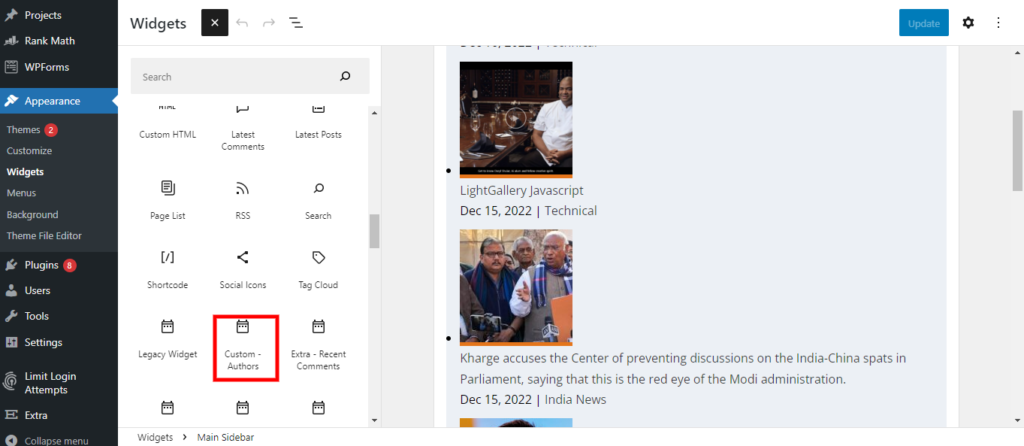
- Pick Widgets from the Appearance menu. In the list of available widgets, you ought to notice a widget with the name Custom – Authors.
- Now, drag the widget and drop it in the sidebar section on the right side of the page.

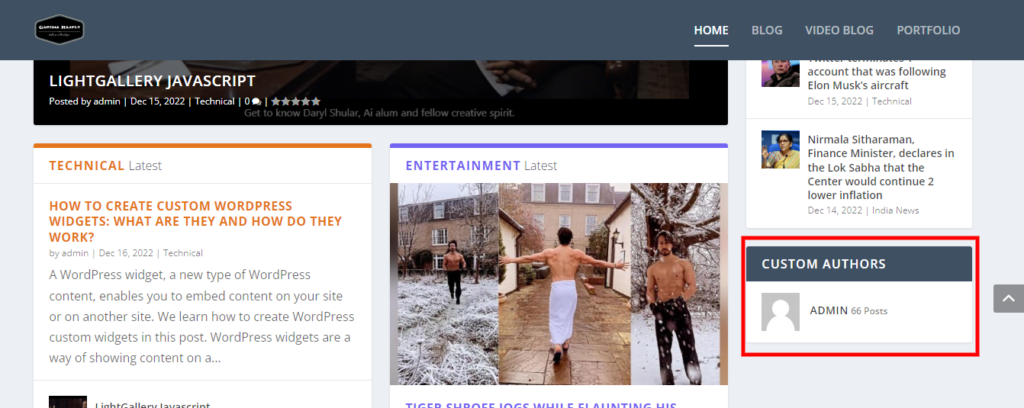
3. Visit your website after saving your modifications. A personalised widget with the list “Authors” within will greet you.

See More Posts:
Twitter terminates 1 account that was following Elon Musk’s aircraft
Jack Dorsey, a former CEO, warns each 1 about hazardous assaults against former coworkers
garimarajput748 | info.garimarajput | msrajawat298 | garima | wordpress developer | php developer


